
The previous couple of pages described creating a SQLite database using the Terminal https://macinchem.co.uk/2023/04/12/using-sqlite-for-exact-search/ and then running exact searches from a Jupyter notebook, python script or ChemDraw AppleScript https://macinchem.co.uk/2023/04/12/other-ways-of-using-the-exact-search/ using ChEMBLID or InChiKeys.
Whilst this provides a very fast look up for specific structures there are of course occasions when a substructure search is required. Fortunately, due to fantastic work from Riccardo Vianello there is Chemicalite a SQLite database extension for cheminformatics applications. This supports storing molecules and fingerprints, compute descriptors, run chemical queries on a SQLite database. It is available on GitHub https://github.com/rvianello/chemicalite and can be installed using Conda. I first created a conda environment called my_SQL
conda create -n mySQL
conda activate my_SQL

conda install -c conda-forge chemicalite
You need to know where the Chemicalite extension is downloaded, for me it is
/Users/chrisswain/miniconda3/envs/my_SQL/lib/chemicalite.dylib
Creating a Database
Whilst this can be done from the Terminal, in this instance we will use a Jupyter notebook. First we need to download the ChEMBL data, download chembl31chemreps.txt.gz from the ChEMBL ftp site https://ftp.ebi.ac.uk/pub/databases/chembl/ChEMBLdb/latest/. The format of the data in the downloaded file is shown below. There are 4 tab separated columns of data, chemblid, Canonicalsmiles, standardinchi and standardinchi_key.

I created a folder called “ChEMBLSQLite” and put the above file in the folder, I then used the Terminal to cd into the folder and created a new notebook. First a couple of imports.
import sqlite3
import csv
Then create a database and load the extension, because this operation loads external code it is initially disabled to avoid potential security risks, so we first enable, load the extension and then disable the load functionality.
connection = sqlite3.connect('chembldb.db')

connection.enable_load_extension(True)
connection.load_extension('/Users/chrisswain/miniconda3/envs/my_SQL/lib/chemicalite.dylib')

connection.enable_load_extension(False)
Next we create a table with the appropriate fields including a molecule field.
connection.execute("CREATE TABLE chembl(id INTEGER PRIMARY KEY, chembl_id TEXT, smiles TEXT, inchi TEXT, inchikey TEXT, molecule MOL)")
The next step is to parse the ChEMBL data
def chembl(path):
    with open(path, 'rt') as inputfile:
        reader = csv.reader(inputfile, delimiter='\t')
        next(reader) # skip header line
        for chembl_id, smiles, inchi, inchikey in reader:
            yield chembl_id, smiles, inchi, inchikey
And then load the data into the database, at the same time using the mol_from_smiles to create a molecule object.
with connection:
    connection.executemany(
        "INSERT INTO chembl(chembl_id, smiles, inchi, inchikey, molecule) "
       "VALUES(?1, ?2, ?3, ?4, mol_from_smiles(?2))", chembl('/Users/chrisswain/Projects/ChEMBLSQLite/chembl_31_chemreps.txt'))
This will populate the database and create a 9GB chembldb.db file.
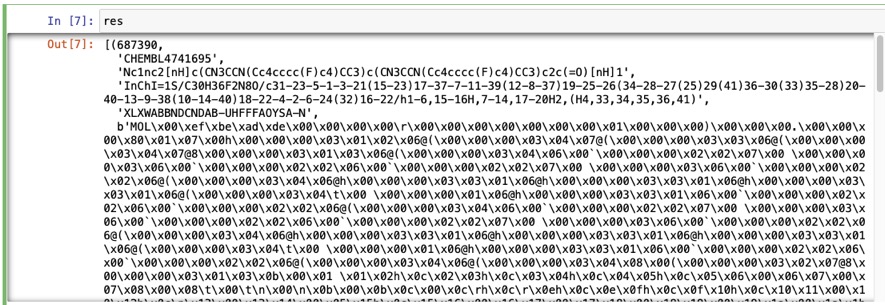
We can check everything is working by running a simple search for CHEMBL4741695
targetchembl = "CHEMBL4741695"

cursor = connection.cursor()
res=cursor.execute("SELECT * FROM chembl WHERE chembl_id == ?",(targetchembl,),).fetchall()

res
The output is shown in the image below, chemblid, Canonicalsmiles, standardinchi, standardinchi_key and the MOL as a binary object.
Structure-Based Searching
We can perform a substructure search using the Mol_is_substruc command. If the query is a SMILES string we need to convert to a mol using mol_from_smiles
res=cursor.execute("SELECT COUNT(*) FROM chembl WHERE mol_is_substruct(molecule, mol_from_smiles('Nc1nc2[nH]c(CN3CCN(Cc4cccc(F)c4)CC3)c(CN3CCN(Cc4cccc(F)c4)CC3)c2c(=O)[nH]1'))").fetchall()

res
[(2,)]
We can use the type of search to return the different record elements in the database, for example to return ChemId or SMILES
resID=cursor.execute("SELECT chembl_id FROM chembl WHERE mol_is_substruct(molecule, mol_from_smiles('Nc1nc2[nH]c(CN3CCN(Cc4cccc(F)c4)CC3)c(CN3CCN(Cc4cccc(F)c4)CC3)c2c(=O)[nH]1'))").fetchall()

resID
[('CHEMBL4741695',), ('CHEMBL4786524',)]


resSMILES=cursor.execute("SELECT smiles FROM chembl WHERE mol_is_substruct(molecule, mol_from_smiles('O=S(=O)(CCO)c1no[n+]([O-])c1-c1ccccc1'))").fetchall()

resSMILES
[('O=S(=O)(CCO)c1no[n+]([O-])c1-c1ccccc1',),
 ('CCOCCS(=O)(=O)c1no[n+]([O-])c1-c1ccccc1',)]
If we try to return the molecule then it is not as straightforward , I tried
testmols=cursor.execute("SELECT molecule FROM chembl WHERE mol_is_substruct(molecule, mol_from_smiles('Nc1nc2[nH]c(CN3CCN(Cc4cccc(F)c4)CC3)c(CN3CCN(Cc4cccc(F)c4)CC3)c2c(=O)[nH]1'))").fetchall()

testmols
[(b'MOL\x00\xef\xbe\xad\xde\x00\x00\x00\x00\r\x00\x00\x00\x00\x00\x00\x00\x01\x00\x00\x00)\x00\x00\x00.\x00\x00\x00\x80\x01\x07\x00h\x00\x00\x00\x03\x01\x02\x06@(\x00\x00\x00\x03\x04\x07@(\x00\x00\x00\x03\x03\x06@(\x00\x00\x00\x03\x04\x07@8\x00\x00\x00\x03\x01\x03\x06@(\x00\x00\x00\x03\x04\x06\x00\x00\x00\x00\x02\x02\x07\x00 \x00\x00\x00\x03\x06\x00\x00\x00\x00\x02\x02\x06\x00\x00\x00\x00\x02\x02\x07\x00 \x00\x00\x00\x03\x06\x00\x00\x00\x00\x02\x02\x06@(\x00\x00\x00\x03\x04\x06@h\x00\x00\x00\x03\x03\x01\x06@h\x00\x00\x00\x03\x03\x01\x06@h\x00\x00\x00\x03\x03\x01\x06@(\x00\x00\x00\x03\x04\t\x00 \x00\x00\x00\x01\x06@h\x00\x00\x00\x03\x03\x01\x06\x00`\x00\x00\x00\x02\x
Then I tried converting to an rdkit mol object but got an error.
rdmols = [Chem.Mol(b[0]) for b in testmols]
---------------------------------------------------------------------------
RuntimeError                              Traceback (most recent call last)
Input In [41], in <cell line: 1>()
----> 1 rdmols = [Chem.Mol(b[0]) for b in testmols]

Input In [41], in <listcomp>(.0)
----> 1 rdmols = [Chem.Mol(b[0]) for b in testmols]

RuntimeError: Bad pickle format: bad endian ID or invalid file format
After some experimentation it seems you need to use the mol_to_binary_mol. I’m not sure why perhaps the SQLite mol object is not the same as the RDKit mol object?
mols=cursor.execute("SELECT mol_to_binary_mol(molecule) FROM chembl WHERE mol_is_substruct(molecule, mol_from_smiles('Nc1nc2[nH]c(CN3CCN(Cc4cccc(F)c4)CC3)c(CN3CCN(Cc4cccc(F)c4)CC3)c2c(=O)[nH]1'))").fetchall()
Then convert to rdkit mol
rdmols = [Chem.Mol(b[0]) for b in mols]
mol = rdmols[0]
mol
I contacted Riccardo and got this explanation
Regarding the stored mol and how it relates to an RDKit molecule. The general idea is that the code should handle the binary blob as some kind of opaque data, and never access it directly, but rather wrap it in a function call that would transform into something suitable for processing. Under the hood, the mol binary blob is still a pickled / binary serialized RDKit molecule, but it’s prepended by a 32 bits header that the chemicalite code uses to verify that the input blob matches the expected data type. Binary fingerprints (and in the future reactions) are similarly stored as binary blobs, but using a different header. These headers are just meant to prevent some low level unrecoverable errors (or worse) that would occur if arbitrary binary data is passed as input to one function or the other, or if a mol is passed where a bfp is expected. The call to mol_to_binary_mol in practice just removes this header and returns the bare rdkit binary mol.
Speeding up the searching
Whilst the searching described above works it is slow because it has to search every record in the database.
ChemicaLite uses a virtual table mechanism to support indexing binary fingerprints in an RD-tree data structure, and this way improve the performances of substructure and similarity queries.
|
1 2 3 4 5 6 7 8 9 |
connection.execute("CREATE VIRTUAL TABLE str_idx_chembl_molecule " + "USING rdtree(id, fp bits(2048))") with connection: connection.execute( "INSERT INTO str_idx_chembl_molecule(id, fp) " + "SELECT id, mol_pattern_bfp(molecule, 2048) FROM chembl " + "WHERE molecule IS NOT NULL") |
This will take a little time to process.
We can then search using
res=cursor.execute("SELECT COUNT(*) FROM chembl, str_idx_chembl_molecule AS idx WHERE chembl.id = idx.id AND mol_is_substruct(chembl.molecule, mol_from_smiles('Nc1nc2[nH]c(CN3CCN(Cc4cccc(F)c4)CC3)c(CN3CCN(Cc4cccc(F)c4)CC3)c2c(=O)[nH]1')) AND idx.id MATCH rdtree_subset(mol_pattern_bfp(mol_from_smiles('Nc1nc2[nH]c(CN3CCN(Cc4cccc(F)c4)CC3)c(CN3CCN(Cc4cccc(F)c4)CC3)c2c(=O)[nH]1'), 2048))").fetchall()
The results are returned very quickly, we can also measure the time taken to execute a cel using the %%time command.
On my Apple Silicon MacBook Pro M1 max
The original search
%%time
res=cursor.execute("SELECT COUNT(*) FROM chembl WHERE mol_is_substruct(molecule, mol_from_smiles('Nc1nc2[nH]c(CN3CCN(Cc4cccc(F)c4)CC3)c(CN3CCN(Cc4cccc(F)c4)CC3)c2c(=O)[nH]1'))")

CPU times: user 42.6 s, sys: 2.54 s, total: 45.2 s
Wall time: 45.2 s
Using the indexed fingerprints
%%time
res=cursor.execute("SELECT COUNT(*) FROM chembl, str_idx_chembl_molecule AS idx WHERE chembl.id = idx.id AND mol_is_substruct(chembl.molecule,  mol_from_smiles('Nc1nc2[nH]c(CN3CCN(Cc4cccc(F)c4)CC3)c(CN3CCN(Cc4cccc(F)c4)CC3)c2c(=O)[nH]1')) AND idx.id MATCH rdtree_subset(mol_pattern_bfp(mol_from_smiles('Nc1nc2[nH]c(CN3CCN(Cc4cccc(F)c4)CC3)c(CN3CCN(Cc4cccc(F)c4)CC3)c2c(=O)[nH]1'), 2048))").fetchall()

CPU times: user 56.3 ms, sys: 6.73 ms, total: 63 ms
Wall time: 61.2 ms
A huge increase in speed.
Similarity searching
The RDKit can be used to generate a variety of fingerprints one of the most popular is the Morgan fingerprint https://www.rdkit.org/docs/source/rdkit.Chem.rdMolDescriptors.html which is a a reimplementation of the extended connectivity fingerprint (ECFP). This fingerprint data is stored and indexed into RD-tree virtual tables as before. We use the Tanimoto coefficient as a measure of similarity.
# create a virtual table to be filled with morgan bfp data
connection.execute("CREATE VIRTUAL TABLE morgan_idx_chembl_molecule " + "USING rdtree(id, fp bits(1024))");

# compute and insert the fingerprints
with connection:
connection.execute(
        "INSERT INTO morgan_idx_chembl_molecule(id, fp) " +
        "SELECT id, mol_morgan_bfp(molecule, 2, 1024) FROM chembl " +
       "WHERE molecule IS NOT NULL")
The similarity search requires to input variables, the query molecule as a SMILES string, and the similarity threshold
target = 'O=S(=O)(CCO)c1no[n+]([O-])c1-c1ccccc1' #query molecule
threshold = 0.5 #similarity threshold
To find out how many similar molecules the search is
count = connection.execute(
    "SELECT count(*) FROM "
    "morgan_idx_chembl_molecule as idx WHERE "
    "idx.id match rdtree_tanimoto(mol_morgan_bfp(mol_from_smiles(?), 2, 1024), ?)",
    (target, threshold)).fetchall()[0][0]

count
14
We can get all the records using
rs = connection.execute(
    "SELECT c.chembl_id, mol_to_smiles(c.molecule), "
    "bfp_tanimoto(mol_morgan_bfp(c.molecule, 2, 1024), "
    "             mol_morgan_bfp(mol_from_smiles(?1), 2, 1024)) as t "
    "FROM "
    "chembl as c JOIN morgan_idx_chembl_molecule as idx USING(id) "
    "WHERE "
    "idx.id MATCH rdtree_tanimoto(mol_morgan_bfp(mol_from_smiles(?1), 2, 1024), ?2) "
   "ORDER BY t DESC",
    (target, threshold)).fetchall()

rs
[('CHEMBL501101', 'O=S(=O)(CCO)c1no[n+]([O-])c1-c1ccccc1', 1.0),
('CHEMBL143521',CN(C)CCS(=O)(=O)c1no[n+]([O-])c1-c1ccccc1', 0.7209302325581395),
('CHEMBL487816', 'NC(=O)CS(=O)(=O)c1no[n+]([O-])c1-c1ccccc1', 0.6818181818181818),
('CHEMBL487815','CCSCCS(=O)(=O)c1no[n+]([O-])c1-c1ccccc1',0.6739130434782609),
('CHEMBL448578', 'CCOCCS(=O)(=O)c1no[n+]([O-])c1-c1ccccc1', 0.6739130434782609),
('CHEMBL443076', 'O=S(=O)(CCO)c1c(-c2ccccc2)no[n+]1[O-]', 0.6511627906976745),
('CHEMBL1215508', 'NS(=O)(=O)c1no[n+]([O-])c1-c1ccccc1', 0.6341463414634146),
('CHEMBL486633', 'O=S(=O)(c1ccccc1)c1no[n+]([O-])c1-c1ccccc1', 0.6190476190476191),
('CHEMBL487646', 'COc1ccccc1NCCS(=O)(=O)c1no[n+]([O-])c1-c1ccccc1',  0.6153846153846154),
('CHEMBL520378', 'C=CS(=O)(=O)c1no[n+]([O-])c1-c1ccccc1', 0.5909090909090909),
('CHEMBL504289', 'O=S(=O)(CCO)c1nonc1-c1ccccc1', 0.5813953488372093),
('CHEMBL3309372',  'NS(=O)(=O)c1ccc(-c2c(S(=O)(=O)c3ccccc3)no[n+]2[O-])cc1',  0.5208333333333334),
('CHEMBL459640', 'NC(=O)c1no[n+]([O-])c1-c1ccccc1', 0.5),
('CHEMBL487425', 'CS(=O)(=O)CCOc1no[n+]([O-])c1-c1ccccc1', 0.5)]
Displaying the results using mols2grid
mols2grid is an interactive molecule viewer for 2D structures, based on RDKit details are on GitHub https://github.com/cbouy/mols2grid and installation instructions are on GitHub . First we import the data into a pandas data frame and set the numbers to 2 decimal places.
import pandas as pd
import numpy as np
from rdkit.Chem import PandasTools
import mols2grid
df = pd.DataFrame (rs, columns = ['ChEMBLID', 'SMILES', 'Similarity'])
df = np.round(df, decimals=2)
df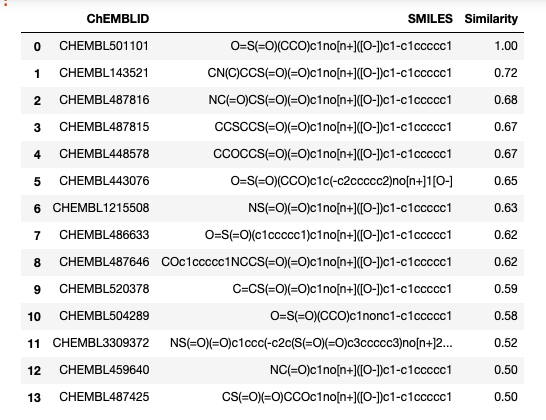
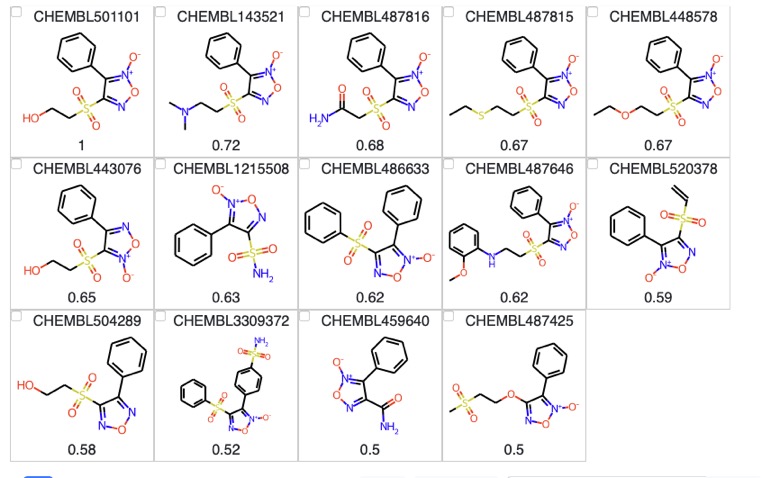
We then import the data frame into mols2grid (there are many options for display but I decided to keep it simple.
mols2grid.display(df, smiles_col="SMILES", subset=["ChEMBLID","img","Similarity"]
             )
Links to notebooks
Constructing the database
Searching the database
Last Updated 12 April 2023