
There have been some changes with Homebrew which have meant that a few of the scientific applications are no longer available so I’ve decided to rewrite the page on installing them to use Anaconda which is now my preferred way to install.
Installation of Homebrew
Homebrew is a package manager for Mac OSX that installs packages in it’s own directory then symlinks the files to /usr/local. The reason I went with Homebrew rather than MacPorts is that I found on occasions MacPorts overwrote existing files. Homebrew instead warns you of any clashes and allows you to decide which version to keep. If you need to remove MacPorts there is a detailed guide. You may also need to update your BASH profile.
To install Homebrew you first need to have access to the command line tools for Xcode, the easiest way to do this is to download Xcode from the Mac Appstore
- Start Xcode on the Mac.
- Choose Preferences from the Xcode menu.
- In the General panel, click Downloads.
- On the Downloads window, choose the Components tab.
- Click the Install button next to Command Line Tools. You are asked for your Apple Developer login during the install process.
Or You can download the Xcode command line tools directly from the developer portal as a .dmg file. https://developer.apple.com/downloads/index.action. On the “Downloads for Apple Developers” list, select the Command Line Tools entry that you want.
For many scientific applications you will also need X11, the easiest way to get this is to install XQuartz. The XQuartz project is an open-source effort to develop a version of the X.Org X Window System that runs on OS X. Together with supporting libraries and applications, it forms the X11.app. the latest downloads are available here
To install Homebrew type this command in the Terminal
ruby -e "$(curl -fsSL https://raw.github.com/Homebrew/homebrew/go/install)"
Then type
brew doctor
The ‘brew doctor’ command checks everything is fine. e.g. it will warn if the developer tools are missing, and if there are unexpected items in /usr/local/bin and /usr/local/lib that may clash and might need to be deleted.
Installing packages using Homebrew
The way Homebrew works is it installs everything to /usr/local/Cellar, then creates aliases in /usr/local/bin and /usr/local/lib so they are on your $PATH. You will likely have stuff manually installed in these directories – this is fine, but if they are things that can be installed using homebrew it’s best to delete them and then reinstall using homebrew.
It is a good idea to first update the package list
brew update
Then we can just run “brew install ” for everything we want. A few examples that you may want:
brew install pkg-config
brew install git
brew install subversion
brew install gcc
brew install python
brew install boost --build-from-source
brew install tcl-tk
gfortran is now part of gcc we can check gfortran is installed, in the Terminal type
man -k fortran
gfortran(1)              - GNU Fortran compiler
and the location
which gfortran
/usr/local/bin/gfortran
which should be an alias to “/usr/local/Cellar/gcc/6.2.0/bin/gfortran”.
Then run
brew install cdk
brew install chemspot
brew install indigo
brew install inchi
brew install opsin
brew install open-babel
You may get errors something like (these are probably older installations).
Warning: Could not link inchi. Unlinking...
Error: The brew link step did not complete successfully
The formula built, but is not symlinked into /usr/local
You can try again using `brew link inchi'

Possible conflicting files are:
/usr/local/include/inchi/inchi_api.h
/usr/local/lib/libinchi.dylib -> /usr/local/lib/libinchi.0.dylib
==> Summary
/usr/local/Cellar/inchi/1.04: 38 files, 1.8M, built in 61 seconds
I deleted the highlighted files, then
brew link inchi
Linking /usr/local/Cellar/inchi/1.04... 37 symlinks created
Update
I just saw this message on the RDKit users message board which offers a method to install RDKit using Homebrew, I use Anaconda (below) to install RDKit so I’ve not tested it.
Recently, I updated the brew install recipe for rdkit on Mac. The biggest change is that boost and boost-python’s versions were pinned down, so that the brew install recipe should be much more reproducible than before. Here is a fail-safe way to install rdkit with it (with Python wrappers, and InChI support):
brew tap rdkit/rdkit
brew update
which python3 || brew install python3
pip3 install numpy
brew unlink boost || echo boost_not_installed
brew unlink boost-python3 || echo boost-python3_not_installed
brew install rdkit --with-python3 --with-inchi
It should install a tagged version of rdkit (Release201903_2) more details are on GitHub https://github.com/rdkit/homebrew-rdkit.
Also came across this video showing how to install MOLDEN. https://www.youtube.com/watch?v=zvrfVNzb-zs
Installation Using Anaconda
Anaconda is a modern package manager and seems to be becoming the preferred source of scientific software. There is a getting started tutorial here
Install Conda using the instructions here https://docs.conda.io/projects/conda/en/latest/user-guide/install/macos.html
You do not need to uninstall other Python installations or packages in order to use conda. Even if you already have a system Python, another Python installation from a source such as the macOS Homebrew package manager and globally installed packages from conda such as pandas and NumPy, you do not need to uninstall, remove, or change any of them before using conda.
Install Anaconda or Miniconda normally (I used miniconda), and let the installer add the conda installation of Python to your PATH environment variable. There is no need to set the PYTHONPATH environment variable
You can check using these commands in the Terminal
MacPro:~ Chris$ echo $PATH
/usr/local/miniconda/bin:


MacPro:~ Chris$ which python
/usr/local/miniconda/bin/python
By default, conda now prefers packages from a higher priority channel over any version from a lower priority channel even if a lower priority channel has a newer version of a package.
The following command adds the channel “yournewchannel” to the top of the channel list, making it the highest priority:
conda config --prepend channels your_new_channel
Conda also now has a command that adds the new channel to the bottom of the channel list, making it the lowest priority:
conda config --append channels your_new_channel
A while back I mentioned BioConda. You can read more details in this publication “Bioconda: A sustainable and comprehensive software distribution for the life sciences”, DOI. Bioconda is a channel for the conda package manager specializing in bioinformatics software. Currently 7377 packages
Bioconda supports only 64-bit Linux and Mac OSX.
conda config --add channels defaults
conda config --add channels conda-forge
conda config --add channels bioconda
You can search Anaconda here https://anaconda.org/search?
To install a package type
conda install [packagename]

conda install -c conda-forge openbabel
conda install -c schrodinger pymol
conda install -c oddt oddt
conda install osra
Of course if you are doing any python scripting you will probably also want to install some or all of.
conda install jupyter
conda install Pillow
conda install numpy
conda install scipy
conda install scikit-learn
conda install pandas
conda install matplotlib
conda install lxml
conda install pycairo
conda install chembl_beaker
conda install standardiser
If a package is not available from conda or Anaconda.org, you may be able to find and install the package with another package manager like pip.
Checking it all works
We can now test the applications are working, to test Opsin in a Terminal window type:
echo "iodobenzene" | opsin -o smi
Run the jar using the -h flag for help. Enter a chemical name to begin:
INFO - Initialising OPSIN...
INFO - OPSIN initialised
IC1=CC=CC=C1
To check that the rdkit python bindings are working: Type ‘python’ to enter the python interpreter, then try:
python
Python 2.7.6 (default, Mar 13 2014, 10:34:57)
[GCC 4.2.1 Compatible Apple LLVM 5.1 (clang-503.0.38)] on darwin
Type "help", "copyright", "credits" or "license" for more information.
>>> from rdkit import Chem
>>> mol = Chem.MolFromSmiles('C1=CC=CC=C1F')
>>> Chem.MolToSmiles(mol)
'Fc1ccccc1'
>>>
To check OpenBabel is working type this in a Terminal window:
obabel -:'C1=CC=CC=C1F' -ocan
Fc1ccccc1
1 molecule converted
To test InChi type this in the Terminal:
inchi_main
InChI ver 1, Software version 1.04 (Library call example; classic interface) Build of September 9, 2011.

Usage:
inchi_main inputFile [outputFile [logFile [problemFile]]] [-option[ -option...]]

Options:

Input
STDIO       Use standard input/output streams
  InpAux      Input structures in InChI default aux. info format
          (for use with STDIO)
SDF:DataHeader Read from the input SDfile the ID under this DataHeader
Output
........
To test chemspot in the Terminal type (change username to your name), beware chemspot is pretty resource hungry.
echo "Iodobenzene was added dropwise to a suspension of magnesium turnings in tetrahydrofuran containing a crystal of iodine, after addition a solution of benzaldehyde in diethyl ether was added dropwise." > /Users/username/Desktop/test.txt
This will create a file on your desktop called test.txt, now type the following
chemspot -t /Users/usename/Desktop/test.txt -o /Users/username/Desktop/untitled.txt
This will create a file on your desktop called untitled.txt
If you open it in a text editor it should read
-1  9   Iodobenzene 000591504       591-50-4            InChI=1S/C6H5I/c7-6-4-2-1-3-5-6/h1-5H                   C031905
49  57  magnesium   022537220   CHEBI:18420 7439-95-4   888 22394505    InChI=1/Mg/q+2  DB01378 HMDB00547   C00305      D008274
71  85  tetrahydrofuran 000109999   CHEBI:26911 109-99-9    8028    36538472    InChI=1/C4H8O/c1-2-4-5-3-1/h1-4H2       HMDB00246
111 116 iodine      CHEBI:24859 14362-44-8          InChI=1/I
148 159 benzaldehyde    000100527   CHEBI:17169 100-52-7    240 7849373 InChI=1/C7H6O/c8-6-7-4-2-1-3-5-7/h1-6H      HMDB06115   C00261  D02314  C032175
164 176 diethyl ether   000060297   CHEBI:35702 60-29-7     585984  InChI=1/C4H10O/c1-3-5-4-2/h3-4H2,1-2H3          C13240  D01772  D004986
To test OSRA you will need an image of chemical structure, you can drag the image below to your desktop.

Then in the Terminal type:
osra /Users/usename/Desktop/indole.png
c1ccc2c(c1)[nH]cc2
For some reason screenshots don’t work at present, a workaround is to open the screenshot image in Preview and save it as a jpeg file.
Or it can be done from the command line using GraphicsMagick
gm convert /Users/swain/Desktop/indole.png /Users/swain/Desktop/indole.gif
or
gm convert /Users/swain/Desktop/indole.png -strip /Users/swain/Desktop/indoleupdated.png
To test filter-it (and the other tools from silicos-it) in the terminal type
 filter-it
+++++++++++++++++++++++++++++++++++++++++++++++++++++++++++++++++++++++++++
Filter-it v1.0.2 | Apr  5 2014 12:28:23

-> GCC:        4.2.1 Compatible Apple LLVM 5.1 (clang-503.0.38)
-> Open Babel: 2.3.90

Copyright 2012 by Silicos-it, a division of Imacosi BVBA
Beaker
Chembl_beaker package was developed at ChEMBL group, EMBL-EBI, Cambridge, UK. It is a wrapper for RDKit and OSRA, which exposes the following methods:
- Format convertion
- Compound recognition
- Raster image (PNG) generation
- Vector image (SVG) generation
- HTML5 ready compound representation
- Fingerprints
- Descriptors
- Maximum Common Substructure
- Smiliarity maps
- ChEMBL standardisation process, consisting of neutralisation, bond breaking, salt removal and applying various rules.
- 3D coordinates generation, using Universal Force Field
- Various other calculations (for example kekulisation)
- Marvin 4 JS compilant webservices
As a portable, lightweight, CORS-ready, REST-speaking, SPORE-documented webserver. This particular implementation wraps RDKit in Bottle on Tornado. To start the web server, in a Terminal window type
run_beaker
Bottle v0.12.5 server starting up (using TornadoServer())...
Listening on http://localhost:8080/
Hit Ctrl-C to quit.
The open a web browser and type in the URL
http://localhost:8080/docs
and you should see the following
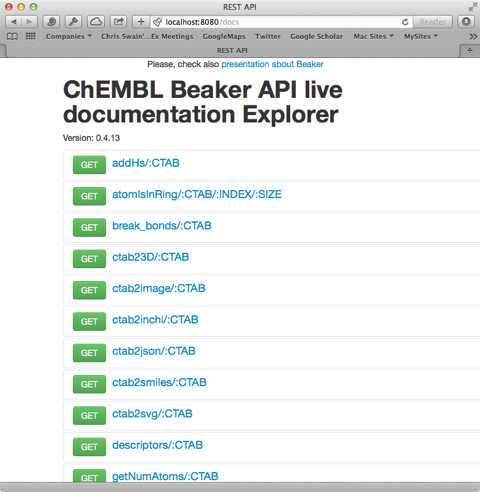
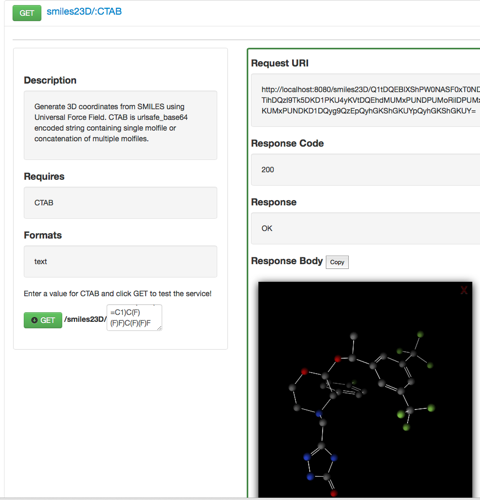
If you select smiles23D/:CTAB and type in a SMILES string and click on the green “GET” button you should see the following response.
Open Drug Discovery Toolkit (ODDT): a new open-source player in the drug discovery field
A recent paper in J Cheminformatics described Open Drug Discovery Toolkit (ODDT): a new open-source player in the drug discovery field DOI a free and open source tool for both computer aided drug discovery (CADD) developers and researchers. Open Drug Discovery Toolkit is released on a permissive 3-clause BSD license for both academic and industrial use. ODDT’s source code, additional examples and documentation are available on GitHub.
You can easily check all is working by running python in a terminal window
python
Python 2.7.10 (default, Jun  3 2015, 09:19:56)
[GCC 4.2.1 Compatible Apple LLVM 6.1.0 (clang-602.0.53)] on darwin
Type "help", "copyright", "credits" or "license" for more information.
>>> import oddt
>>> mol = oddt.toolkit.readstring('smi', 'Cc1c(cc(cc1[N+](=O)[O-])[N+](=O)[O-])[N+](=O)[O-]')
>>> mol.atom_dict['atomtype']
array(['C.3', 'C.ar', 'C.ar', 'C.ar', 'C.ar', 'C.ar', 'C.ar', 'N.pl',
   'O.2', 'O.co', 'N.pl', 'O.2', 'O.co', 'N.pl', 'O.2', 'O.co'],
  dtype='|S4')
>>> mol.atom_dict['isacceptor']
array([False, False, False, False, False, False, False, False,  True,
    True, False,  True,  True, False,  True,  True], dtype=bool)
>>>
The publication also includes a series of iPython notebooks to get you started.
Installing Amber/AmberTools on macOS
I don’t use Amber but a number of readers have asked me about installation. Rather than go though it here I would simply refer you to a superb detailed explanation here https://www.ovetande.se/software/amber/install/ambertools19-macos-10-14-4-xcode-10-2-1/.
Installing Amber/AmberTools on macOS has become much easier though is not to be considered completely trivial. Below different methods are presented to install the current version of AmberTools, where the method should be the same for Amber
Updated 21 August 2021
One thought on “Cheminformatics on a Mac”
Comments are closed.